


I self-published my first children’s book, WYOMING FROM A TO Z, on CreateSpace. Unfortunately, CreateSpace no longer exists. About a year ago, Amazon acquired CreateSpace and absorbed it into their publishing arm, Kindle-Direct-Publishing, also known as KDP.
CreateSpace was geared to traditional paperback publishing, whereas KDP is more geared to the eBook. For novels and short stories, the transition has been fairly painless, but if you want to publish a children’s picture book, you’ll find the process a bit more difficult. This post is meant to walk you through how I was able to do it.
First of all, there are many self-publishing sites out there, but I wanted to stick with something similar to CreateSpace, for one simple reason:
You don’t have to pay anything up front.
KDP offers what CreateSpace did–there was no up-front cost and my royalties were 60% of sales and 40% for international sales. The downside to publishing through KDP is that you can only create paperback books. No hardcovers and no board books. That’s mostly because of the high cost per book to produce. My paperback picture books cost about $3.65 per book to produce. Hardbacks will run $13.00+ and board books even more.
To get started with KDP, I went to their website: https://kdp.amazon.com/en_US/ .
It will ask you to sign in with your Amazon account, and I would recommend you create a new, author account and keep it separate from your personal amazon account.
Once you have an author account, you create your book by clicking on BOOKSHELF. That page will open up to show all of your current paperbacks and eBooks. The first section is where you can create a new title. Note you can create either a Kindle eBook or a paperback. Don’t worry about which one you choose first. You will be given the opportunity to make the other type later on.
The first thing you’ll do is fill in the paperback or Kindle eBook Details: Language, Book Title, Series, Edition Number, Author, Contributors, Description, Publishing Rights, Keywords, Categories, Age and Grade Range, and Pre-Order. The blocks are self-explanatory with the ability to explore in more detail if you have questions about filling out the blocks.
At the bottom, you will either “save as Draft” or “Save and Continue.”
The next box is where you will input your paperback or Kindle eBook content. You fill in details for the following: Print ISBN (it will be created for you,) Publication Date, Print Options, Manuscript, Book Cover, Book Preview, and Summary. Under Print Options is where it starts to get complicated. For a novel or typed manuscript it’s pretty easy, just select the color of your interior, and cream or white paper. Select the trim size of the book, no bleed, and either a Matte or Glossy cover finish. For a picture book, you have to select “Color interior with white paper,” then your trim size, and then be sure to select “Bleed” for your bleed settings, and finally, Matte or Glossy cover finish.
Obviously, the size of your book will determine printing costs. My picture books are all 8.5 in x 8.5 in but you can certainly choose another size.
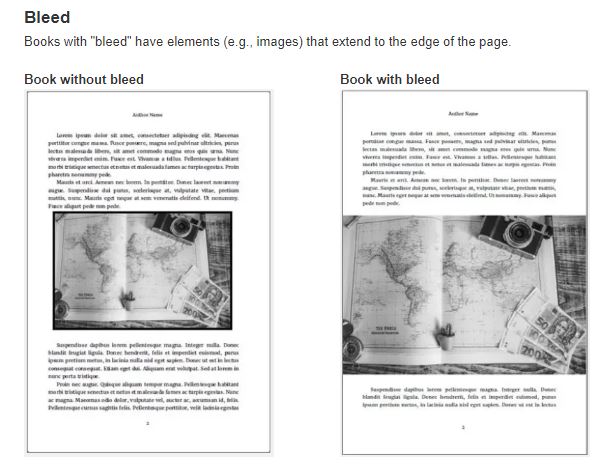
The Bleed setting is the most important and most complicated part of doing the picture book. Bleed simply means the picture extends all the way to the edge of the page, and it’s important for the picture to bleed to the edge of the page so that when it’s trimmed (cut) to be printed, there is no white space bordering the picture. See Figure 1 below for examples of bleed or without bleed.
When determining the size of your picture book, you must add 0.125″ to the page width and 0.25″ to the page height to account for trimming. Using my book for an example, to create an 8.5″ width x 8.5″ tall book, my pages were created as 8.625″ width x 8.75″ tall pages. this goes for the cover too. On the KDP Content page, under Bleed Settings, there is an area of blue text that says “What are bleed settings?” move your cursor over that for an explanation, and click on the blue text in the pop up that says “Learn more about bleed” to go to a web page that covers this in-depth.
The next section on the KDP Content page is Manuscript. This is where you upload your book. Click on the yellow button that says “Upload paperback manuscript.” If you are doing a novel or a document that only contains words, you can upload a Word document here, either in .doc or .docx format. However, if you are doing a document that has pictures, which for me means a picture book, you have to upload a PDF file to be successful. Here’s where KDP drops the ball. When I used CreateSpace for my previous picture book, if the PDF or document I uploaded had a problem, CreateSpace would show you the document and highlight the problem areas on each page, whether a problem with bleed, or text getting cut off, or whatever. KDP doesn’t do that. If there’s a problem with the manuscript you uploaded, you will just get a red “!” with NO EXPLANATION as to what’s wrong with the upload. It could be too large of a document, or any of a number of different things.
At first, I tried downloading KINDLE CREATE. This is a software program that you can use to make the book. The software allows you to select the type of book you are creating: either a novel, essay, poetry, narrative non-fiction. The software looks like this:
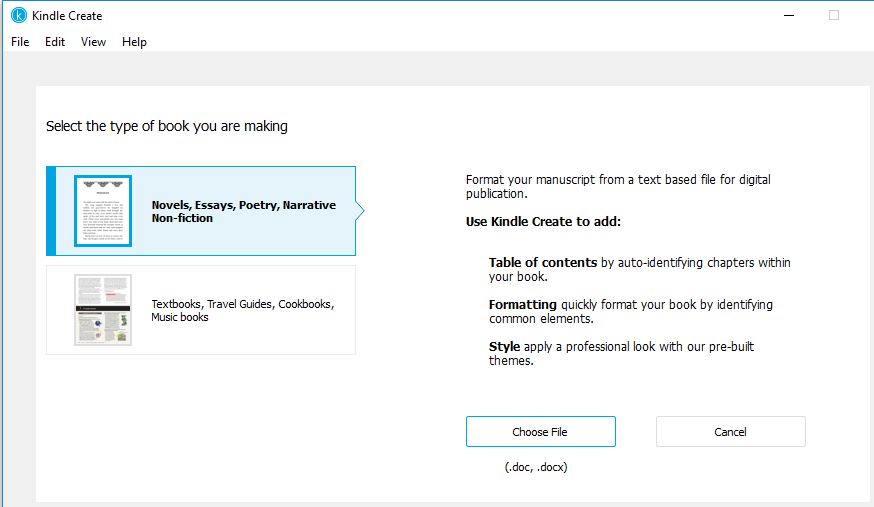
As you can see above in Figure 2, at the end, you are still stuck with having to upload a file of your manuscript. For a picture book, your only other choice is the second option, selecting the textbook, travel guide, cookbook, music book option. Selecting that option brings up what you see below in Figure 3.
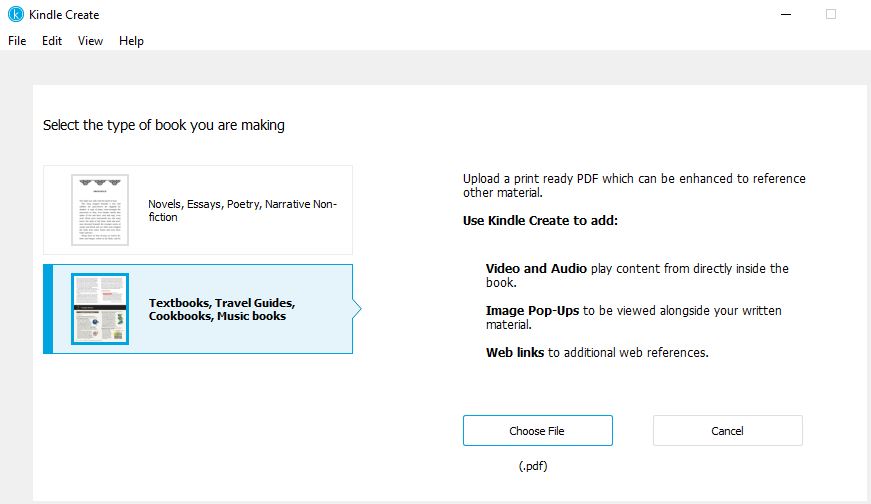
Again, you end up at the same place, having to upload a PDF of your manuscript. I even tried downloading another KDP program called “Kindle Kid’s Book Creator,” but it does the same thing. You still have to have a PDF to upload, and if the program doesn’t like the PDF it is rejected without explanation.
Here’s how I got around that:
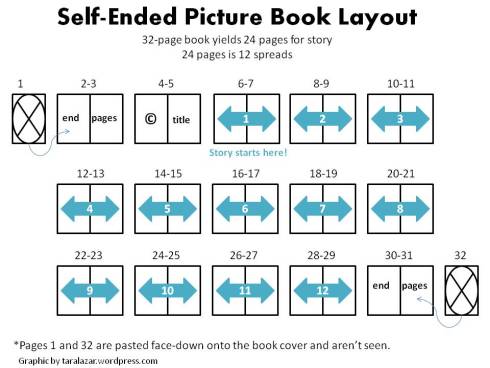
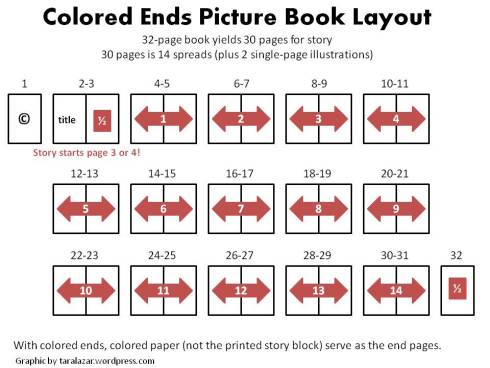
You can use a drawing program like Adobe Illustrator if you can afford it, but I use a free program available online called “Gimp.” It is a fantastic program for drawing, and also for creating pages using photographs, etc. Before we get into Gimp, you need to know there are two types of children’s picture book layouts: Self-Ended, which uses 12 spreads or 24 pictures (Figure 4)
Or the Colored Ends Layout (Figure 5.) This is the layout I went with for my children’s books.
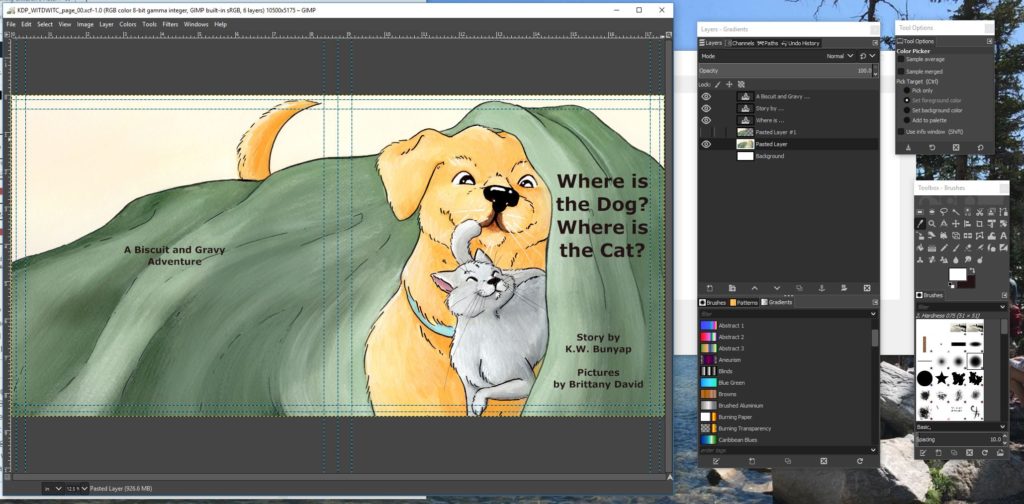
I made my own illustrations for WYOMING FROM A TO Z, but for my second book, WHERE IS THE DOG? WHERE IS THE CAT? I hired the wonderful Brittany David to do my illustrations. She made 14 spreads and 2 single page illustrations for me. I ended up with 600 dpi illustrations.
Using Gimp was fairly straight forward. I needed to create pages that would be 8.625w x 8.75h to include the bleed for my 8.5 x 8.5 book. Now, since my illustrations from Brittany were spreads, I created a new document I named “single_page” with the dimensions 8.625w x 8.75h for my single pages and then created a second document named “spreads” with the dimensions 17.25″w x 8.75″h. I dragged and dropped the illustrations to the document in gimp. then added text. (See Figure 6 below.)
If you look at the picture above, I added 0.125″ margins on all the borders to see where the bleed was, and also added second 0.375″ margins to see where the text was placed so as to make sure no text was cut off at the page edges.
Gimp worked well because after I saved each picture as a .xcf file (gimp file) I could export the picture as a jpeg file (.jpg). I ended up cutting each of my spreads in half so that I had a total of 30 half-page jpegs that were the correct dimensions (8.625×8.75.)
I learned that in Word you can save a file as a .pdf instead of a .docx. However, working with Word was very difficult when trying to place pictures on each page. It’s very clunky and often the facing pages would not be lined up. In the end, I ended up downloading a new, free program called Scribus, which works great for desktop publishing. I created a new document in Scribus with width and height as seen below in Figure 7. Note the margins are set to o.ooo.
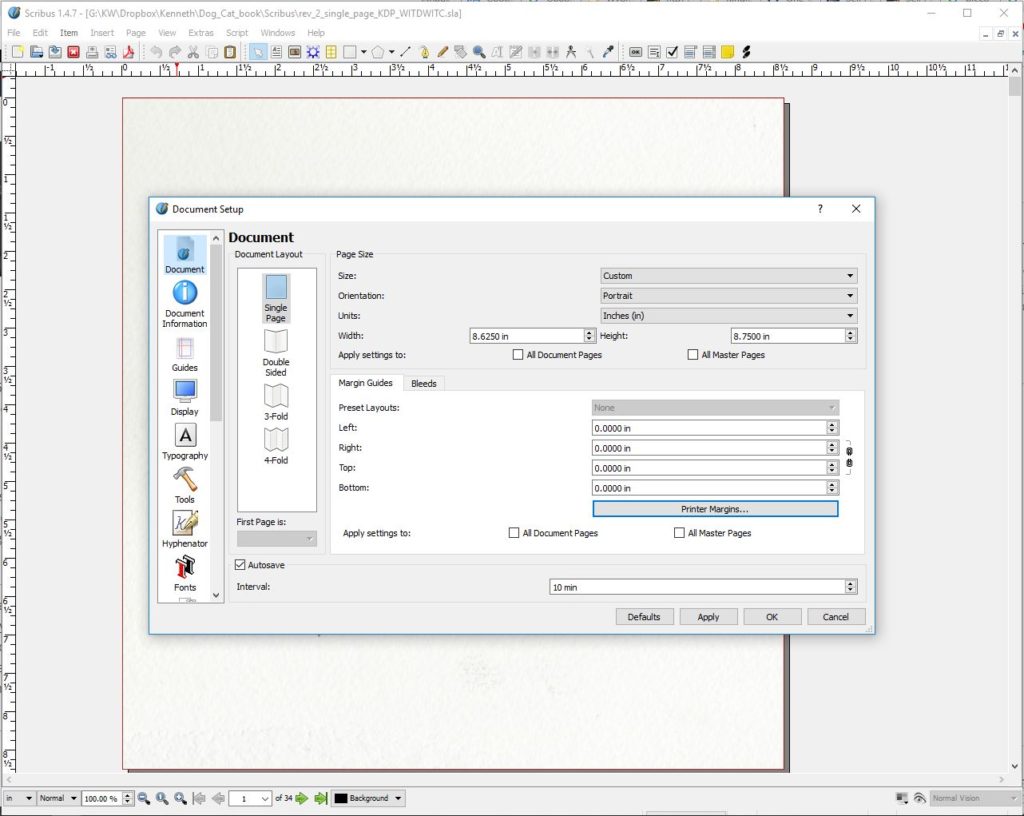
Open the second tab, called “bleeds” and set the margins for 0.000 also.
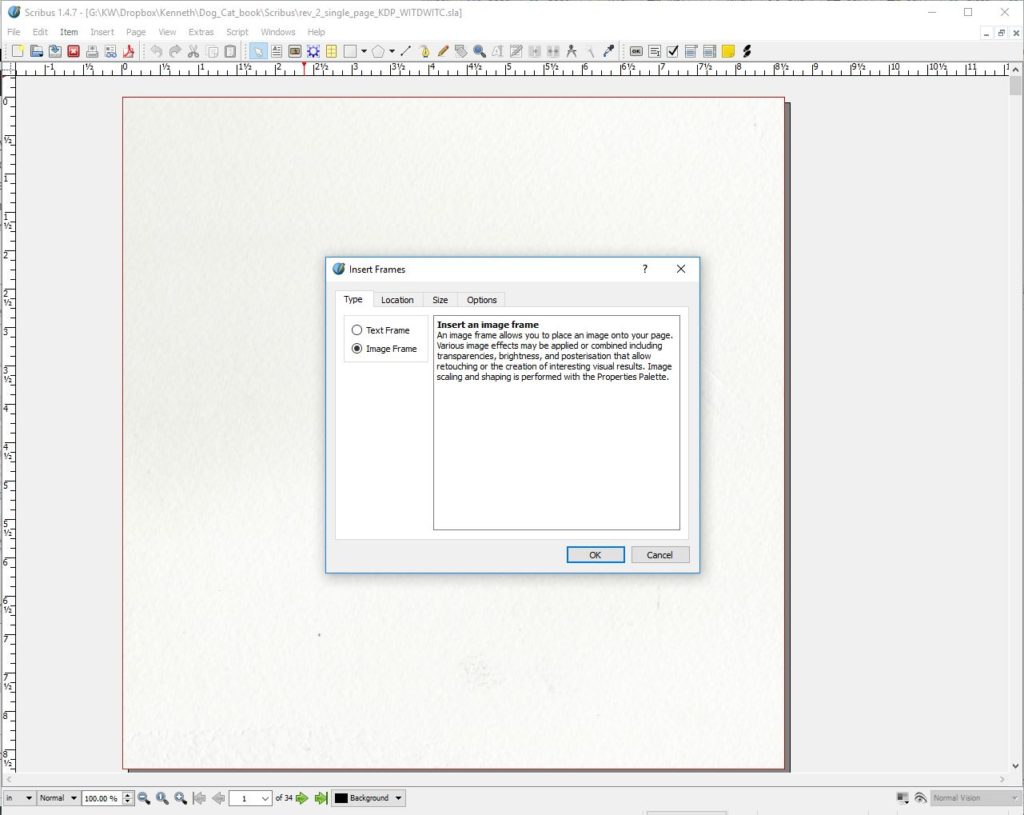
Next, I would select each frame, then select “Insert” from the top menu, select “frame,” then select “image frame” from the “type” tab. (Figure 8.)
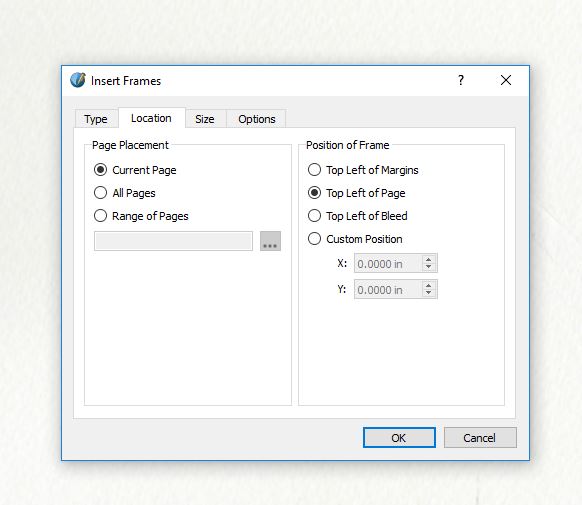
Select the “location” tab and choose “current page” and for “Position of Frame” select “Top left of Page” (Figure 9.)
Then select the “Size” tab and select “Same as the Page.” Click “Ok”. On the page you will see a big X appear, extending from page corner to page corner. (Figure 10.)
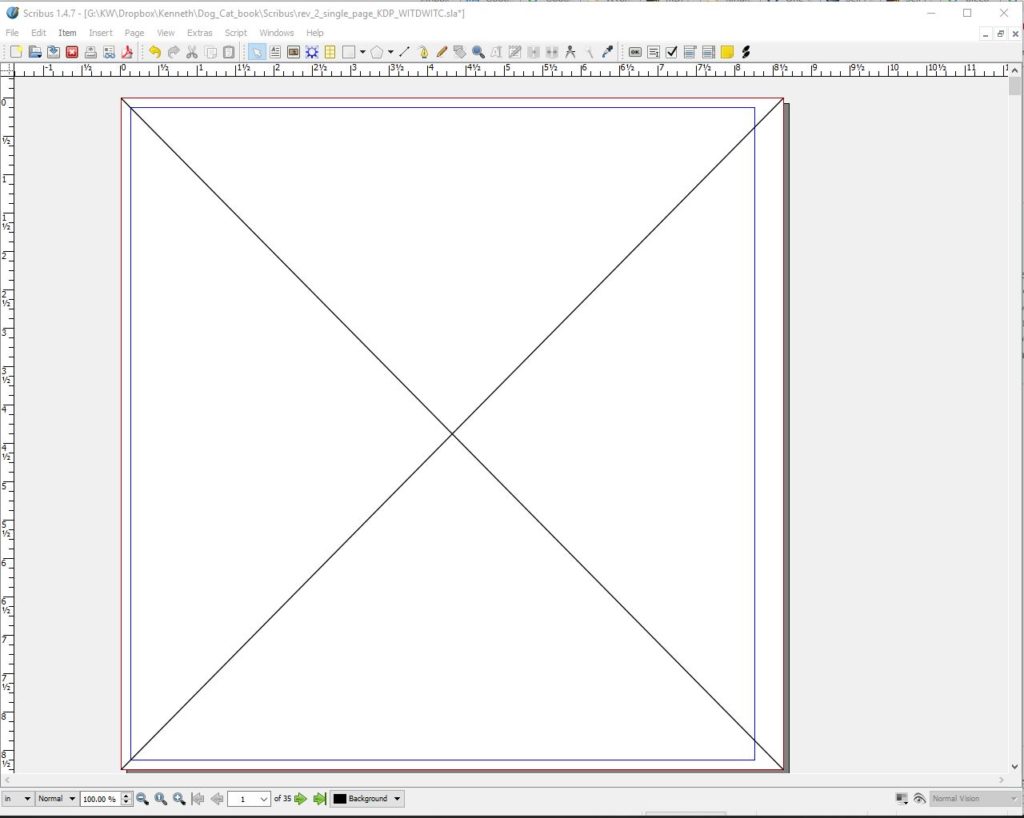
Now just drag and drop your .jpg image to each X frame. The .jpg should already be the same size as the frame, both (8.625 x 8.75) in my case.
I ended up with 30 total pages, then I added a “The End” at the end, and a dedication page at the beginning so I ended up with 32 pages. Once all the Scribus pages were in order, I saved the Scribus file, then chose “File”, “Export”, “Save as PDF.” The exported file was the file I uploaded to KDP.
Next on the KDP Content page is Book Cover. I uploaded a 17.25″ x 8.75″ spread book cover (front and back) that I had exported from Gimp as a PDF. Took the image in Figure 6 and exported it by selecting “File”, “Export as”, “Select File Type (By Extension)”, then “Portable Document Format” as shown in Figure 11.

This Cover .pdf is what I uploaded to KDP for the cover. You can also use their cover creator if you desire.
If all goes well, at this point under Manuscript and Book Cover it will say “uploaded successfully.” Then you go to Book Preview on the KDP Content page and select the yellow button “Launch Previewer”.
Be sure to “Save as Draft” periodically.
After launching the Previewer (it takes awhile to load,) you can scroll through the uploaded book. In my case, there was a bit of white space at the top of each page which looked like it was wrong. I recommend you do like I did and go to the upper right of the page and click “Download a PDF proof” and look at the download in your PDF viewer. I use Adobe Acrobat. When I did this, the white space was gone and the proof looked great.
After reviewing, click “Approve” and to “Exit Print Previewer” if you are happy with the look of the proof. The summary at the bottom of the KDP Content page will show the printing cost per book. click “Save and Continue” and you will go to the PAPERBACK RIGHTS &PRICING page. I selected “All territories (worldwide rights)”. Determine your list price by doing a little google research. The PRICING AND ROYALTY section will show your percent rate and royalty payment per book.
The next thing you should do is “Request printed proofs of this book” so that you can review a hard copy. You’ll have to follow the instructions and purchase the proof from Amazon. The shipping costs about as much as the book, but in a few days you’ll get the hard copy.
Make any changes by repeating the steps above, and when you are happy with the printed proof copy, you can select “Publish Your Paperback Book” and it will go live!!!
You can do the same thing as outlined above to upload an ebook. You essentially upload a PDF, just like you did for the paperback. I personally don’t like the way picture books look on tablets, Kindles, and eReaders because they are all of different screen sizes. But, I would download the KINDLE CREATE program as mentioned above, because the program does help you create an eBook with text that will expand when clicked on, which is a nice added feature. When you finish the same process with the eBook and are satisfied with the Proof, you can Publish the eBook the same way.
I hope this blog post has helped you to navigate publishing a Children’s Picture Book on KDP. If you have questions or comments, feel free to add them here or email me at authorkwbunyap@gmail.com
K.W. Bunyap